什么是xxl-job,它解决什么问题
我们在日常项目开发中,可能会用到分布式调度,在这期间我们可能会遇到这些问题:
- 同一个服务中可能存在多个互斥的任务,需要统一调度和协调。
- 定时任务运行期间,为了确保任务能够稳定运行,我们希望能够做到高可用、监控运维、故障告警。
- 需要统一管理和追踪个个服务节点定时任务的情况,以及任务属性信息,比如:任务所属服务、所属责任人等信息。
所以我们这里就需要用到xxl-job这个轻量级框架。
XXL-JOB功能特性
XXL-JOB主要有以下几个功能特性:
- 简单易用:提供web页面对任务进行管理,管理系统支持用户管理、权限控制;支持容器部署,还支持通过HTTP提供跨平台任务调度。
- 丰富的任务管理功能:XXL-JOB支持页面对任务的增删改查操作,同时还支持页面编写脚本、Java代码任务并行。甚至还支持任务级联编排、父任务执行结束后触发子任务。支持任务设置优先级、支持设置指定任务的路由策略,包括:轮询、随机、广播、故障转移、忙碌转移等等。配置定时任务时,它还支持使用cron表达式。
- 高性能:调度中心是基于线程池多线程触发调度任务的,通过对快任务和慢任务的隔离调度,提高系统的性能和稳定性。任务调度流程完全是异步化设计和实现,如异步调度、异步运行、异步回调等,这些特性都可以实现密集流量的削峰。
- 高可用:任务调度中心、任务执行节点都可以集群部署,支持动态扩展、故障转移,同时还支持路由故障转移策略,执行器节点不可用时还能故障转移到其他节点。支持任务超时控制、失败重试配置,也支持任务处理阻塞策略,例如当任务执行节点忙碌的来不及执行新任务时会执行串行、抛弃、覆盖等策略。
- 易于监控和维护:支持设置任务失败告警,,同时还支持实时查看任务执行数据统计图表、任务进度监控、任务完整执行任务等数据。
XXL-JOB相比其他分布式调度框架的优势
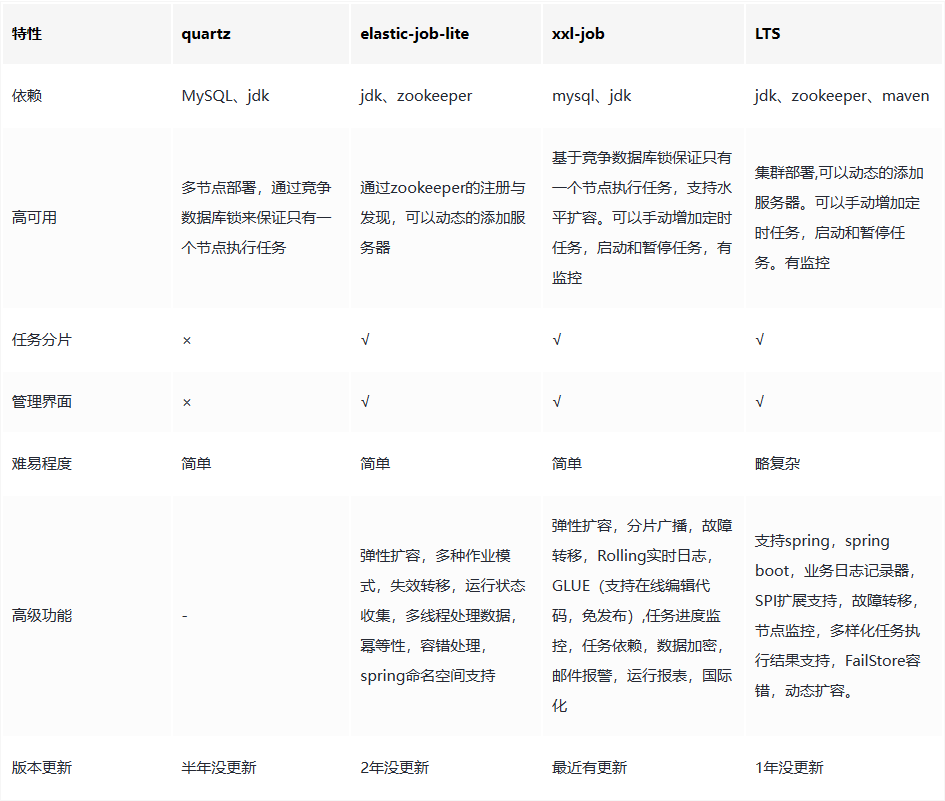
从下面这张表中我们可以看出xxl-job相比于其他框架,不仅支持高可用,功能也更多、更灵活,而且版本也一直在维护,是一个非常受欢迎的分布式任务调度平台。
实践
基于xxl-job完成用户注册
因为xxl-job官网对快速上手教程写的非常清楚了,笔者这里就不多做介绍了,感兴趣的读者可以自行到xxl-job官网完成一下基础入门工作:
分布式任务调度平台XXL-JOB(opens new window)
需求介绍
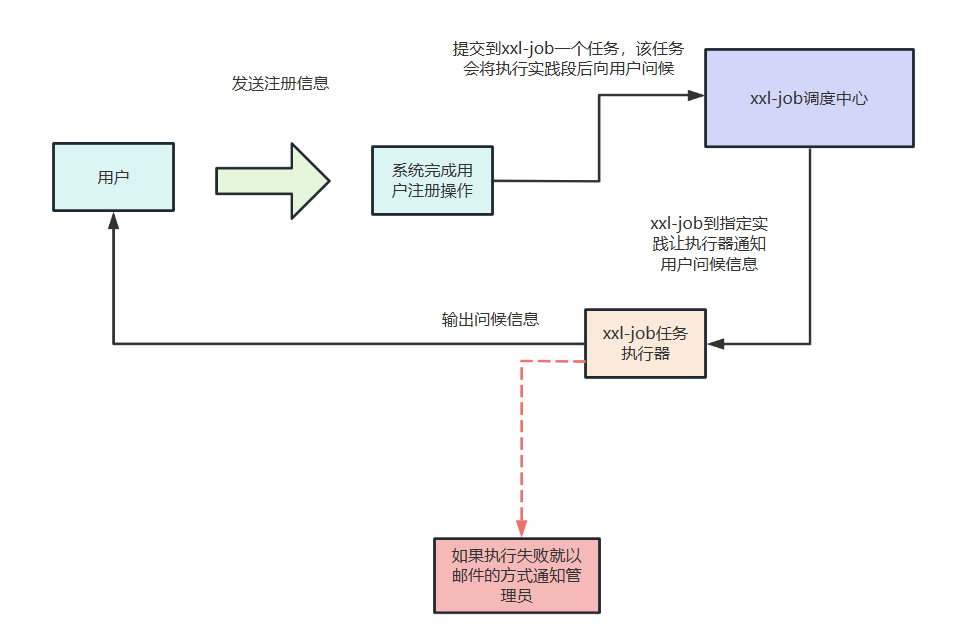
我们现在有这么一个需求,我们希望用户通过我们的接口完成用户信息注册之后,完成后台一些工作之后对用户输出一句问候。注意,由于问候这个操作和我们的核心业务没有关系,所以我们希望将这个问候的操作提交到xxl-job中执行。 当然如果在后台任务执行错误时,我们希望能够通过邮件的方式告知管理员。
部署xxl-job-admin
我们首先需要完成一下xxl-job的基础部署,首先到gitee上把xxl-job拉下来,源码地址
https://gitee.com/xuxueli0323/xxl-job.git(opens new window)
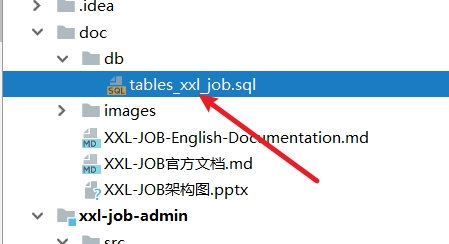
完成后我们找到文件夹里的找到tables_xxl_job.sql这个文件,将其刷到我们的数据库中。
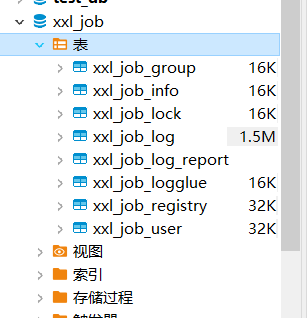
将上述脚本刷完之后,数据就如下图所示:
然后我们还需要对xxl-job-admin的配置文件的数据库配置进行一些简单的修改。
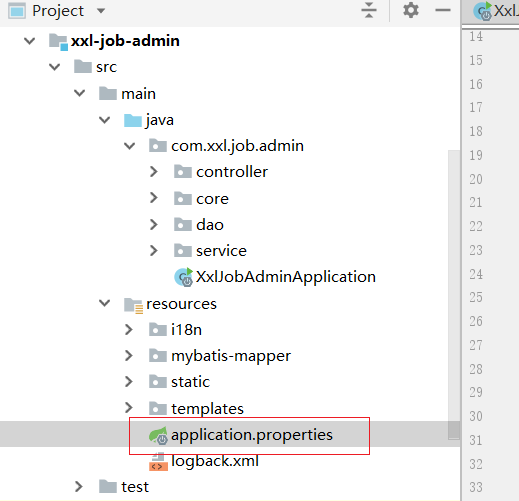
如下所示,笔者将数据库的url、账户、密码改为自己数据库对应的值。
### xxl-job, datasource
spring.datasource.url=jdbc:xxxxxx:3306/xxl_job?useUnicode=true&characterEncoding=UTF-8&autoReconnect=true&serverTimezone=Asia/Shanghai
spring.datasource.username=xxxx
spring.datasource.password=xxxxx
spring.datasource.driver-class-name=com.mysql.cj.jdbc.Driver
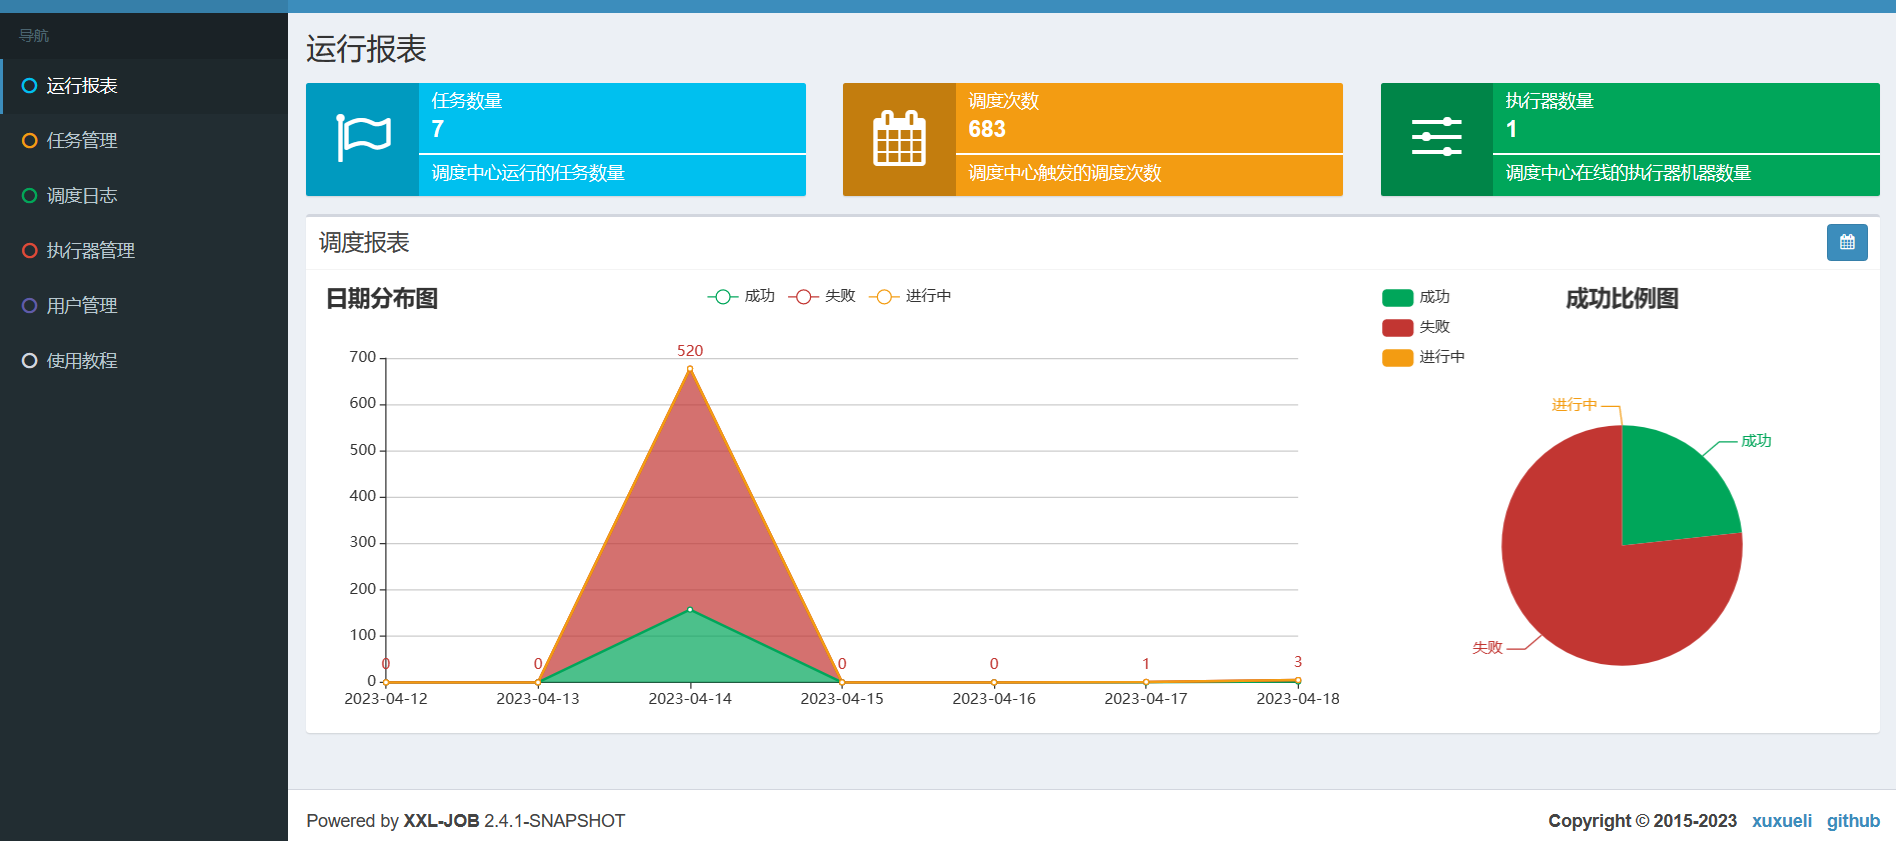
完成后我们尝试将xxl-job启动,默认情况下用户名和密码分别时admin和123456,如果我们输入用户密码后可以进入到这个页面,就说明我们的xxl-job-admin部署成功了。
创建自定义项目并完成基础配置
完成xxl-job-admin的部署之后,我们就可以开始开发我们的功能了,我们首先需要创建一个spring-boot项目。然后到配置文件中添加如下几个部分的信息。
首先自然是端口号和xxl-job-admin信息,具体内容参见下方注释:
server:
  port: 9090

# xxl-job
xxl:
  job:
    admin:
      addresses: http://127.0.0.1:8080/xxl-job-admin # 调度中心部署跟地址 [选填]:如调度中心集群部署存在多个地址则用逗号分隔。执行器将会使用该地址进行"执行器心跳注册"和"任务结果回调";为空则关闭自动注册;
    executor:
      appname: hresh-job-executor # 执行器 AppName [选填]:执行器心跳注册分组依据;为空则关闭自动注册
      ip: # 执行器IP [选填]:默认为空表示自动获取IP,多网卡时可手动设置指定IP,该IP不会绑定Host仅作为通讯实用;地址信息用于 "执行器注册" 和 "调度中心请求并触发任务";
      port: 6666 # ### 执行器端口号 [选填]:小于等于0则自动获取;默认端口为9999,单机部署多个执行器时,注意要配置不同执行器端口;
      logpath: F:\log\xxl-job\ # 执行器运行日志文件存储磁盘路径 [选填] :需要对该路径拥有读写权限;为空则使用默认路径;
      logretentiondays: 30 # 执行器日志文件保存天数 [选填] : 过期日志自动清理, 限制值大于等于3时生效; 否则, 如-1, 关闭自动清理功能;
    accessToken: default_token  # 执行器通讯TOKEN [选填]:非空时启用;
由于笔者的用户注册涉及user表,所以这里还需要配置user表所对应的数据库信息:
spring:
  application:
    name: xxl-job-practice
  datasource:
    type: com.alibaba.druid.pool.DruidDataSource
    driver-class-name: com.mysql.cj.jdbc.Driver
    url: jdbc:mysql://xxxxxxxx:3306/test_db?serverTimezone=Hongkong&characterEncoding=utf-8&useSSL=false
    username: xxxx
    password: xxxxxx
完成基本项目配置之后,我们就可以开始编码工作了。我们首先需要创建一个执行器,代码如下,逻辑很简单,从配置文件中读取xxl-job-admin的配置信息完成执行器初始化使其加载到spring容器中。
@Configuration
public class XxlJobConfig {

  @Value("${xxl.job.admin.addresses}")
  private String adminAddresses;
  @Value("${xxl.job.executor.appname}")
  private String appName;
  @Value("${xxl.job.executor.ip}")
  private String ip;
  @Value("${xxl.job.executor.port}")
  private int port;
  @Value("${xxl.job.accessToken}")
  private String accessToken;
  @Value("${xxl.job.executor.logpath}")
  private String logPath;
  @Value("${xxl.job.executor.logretentiondays}")
  private int logRetentionDays;

  /**
   * 执行器
   * @return
   */
  @Bean
  public XxlJobSpringExecutor xxlJobExecutor() {
    // 创建 XxlJobSpringExecutor 执行器
    XxlJobSpringExecutor xxlJobSpringExecutor = new XxlJobSpringExecutor();
    //设置调度中心地址
    xxlJobSpringExecutor.setAdminAddresses(adminAddresses);
    //设置执行器名称
    xxlJobSpringExecutor.setAppname(appName);
    //设置ip地址
    xxlJobSpringExecutor.setIp(ip);
    //设置端口号
    xxlJobSpringExecutor.setPort(port);
    //执行器通讯token
    xxlJobSpringExecutor.setAccessToken(accessToken);
    //设置日志的路径
    xxlJobSpringExecutor.setLogPath(logPath);
    //设置执行器保存天数
    xxlJobSpringExecutor.setLogRetentionDays(logRetentionDays);
    return xxlJobSpringExecutor;
  }
}
魔改xxl-job
我们希望我们的任务能够在用户完成注册之后像xxl-job提交一个随后向用户问好的定时任务。所以我们必须对xxl-job进行一些扩展,以实现:
- 让xxl-job提供一个能够添加任务的restful api。
- 让xxl-job提供一个能够删除任务的restful api。
- 让xxl-job提供一个能够根据具体执行器名称查询执行器具体信息的restful api。
为了实现这一点,我们不妨到xxl-job-admin的web页面进行点击了解一下有没有相似的api。首先自然是第一点,完成任务添加,我们不妨到web页面中点击新增按钮完成任意一个任务的添加。
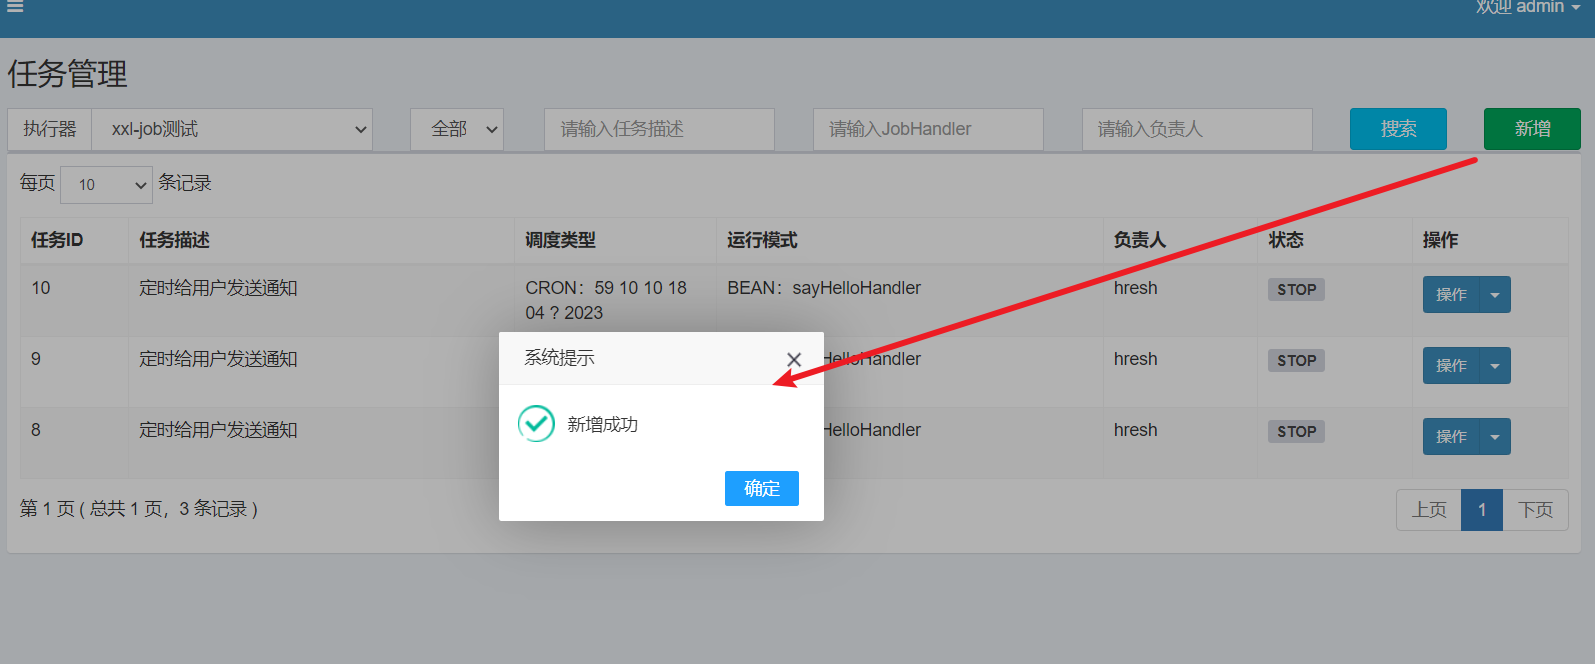
此时我们就会在network中看到这么一个接口

对应参数如下,可以看到是表单的形式传参。
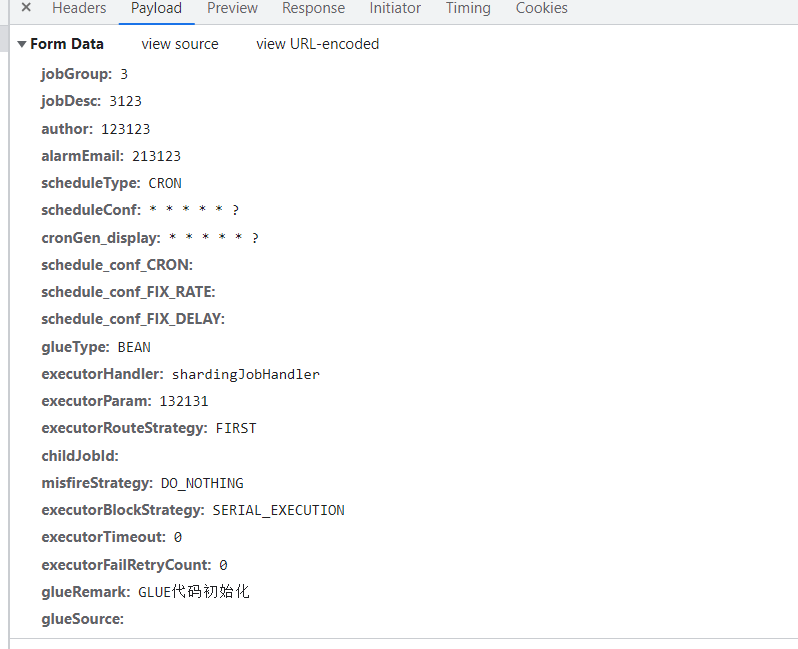
然后我们就从xxl-job中定位到了源码,逻辑很简单就是简单的调用一下xxlJobService。
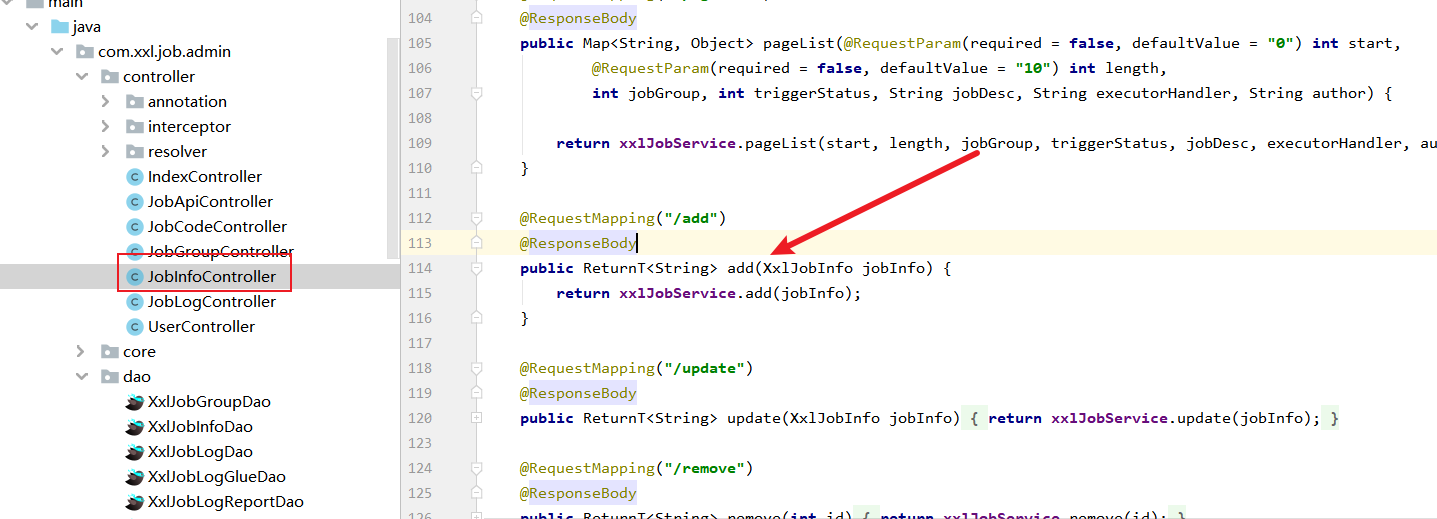
对此我们照抄这个逻辑,在JobInfoController中添加我们自定义的方法addJob,注意我们为了绕过xxl-job的权限校验加了PermissionLimit注解。
@RequestMapping("/addJob")
	@ResponseBody
	@PermissionLimit(limit = false)
	public ReturnT<String> addJob(@RequestBody XxlJobInfo jobInfo) {
		return xxlJobService.add(jobInfo);
	}
同理我们观察删除任务的api,也实现一个移除任务的方法。
@RequestMapping("/removeJob")
	@ResponseBody
	@PermissionLimit(limit = false)
	public ReturnT<String> removeJob(String id) {
		return xxlJobService.remove(Integer.parseInt(id));
	}
还一个根据根据应用名称精确获取执行器的信息的api,我们可以到执行器管理点击搜索。

同理我们会得出这样一个接口。

表单参数如下
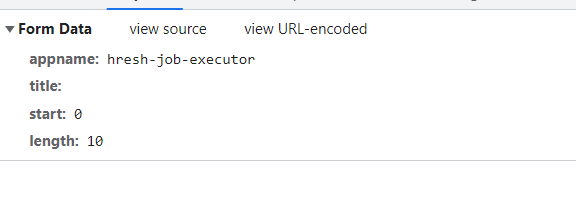
我们从接口定位到代码,发现是一个分页查询,不符合我们的需求,所以我们通过源码定位到持久层sql,添加一个自定的查询sql。
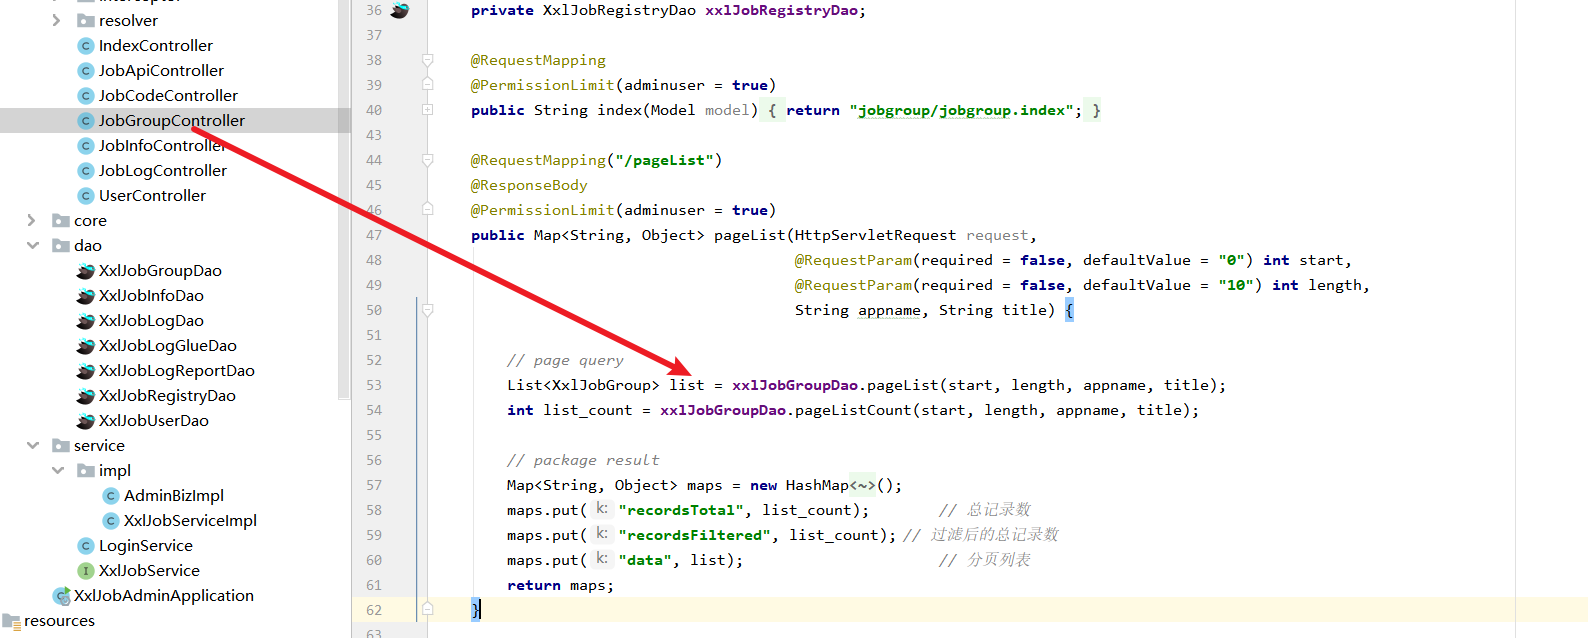
我们可以到XxlJobGroupDao添加一个loadByAppName

xml的代码如下所示:
<select id="loadByAppName" parameterType="java.util.HashMap" resultMap="XxlJobGroup">
		SELECT
		<include refid="Base_Column_List"/>
		FROM xxl_job_group AS t
		WHERE t.app_name = #{appName}
	</select>
最后我们在JobGroupController添加如下代码,自此我们对xxl-job的拓展工作就完成了。当然在此提醒一下,正常开发流程时,我们建议在这个阶段自测一下接口的可用性,因为笔者在这里都测试过了,所以不展开了。
@RequestMapping("/loadByAppName")
	@ResponseBody
	@PermissionLimit(limit = false)
	public ReturnT<XxlJobGroup> loadByAppName(@RequestBody Map<String, Object> map) {
		XxlJobGroup jobGroup = xxlJobGroupDao.loadByAppName(map);
		return jobGroup != null ? new ReturnT<XxlJobGroup>(jobGroup)
				: new ReturnT<XxlJobGroup>(ReturnT.FAIL_CODE, null);
	}
实现自定义应用调用xxl-job-admin
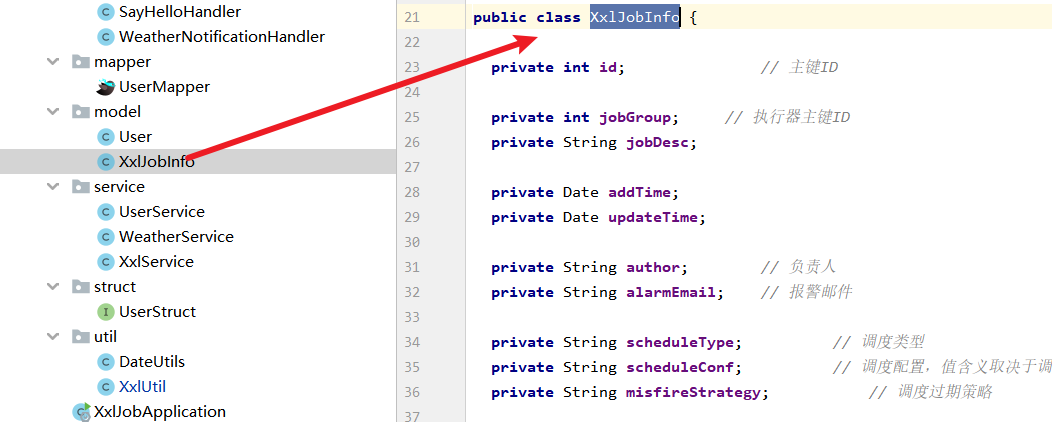
接下来我们就回到自己开发的web应用,完成对xxl-job-admin的远程调用。首先我们需要将xxl-job-admin的XxlJobInfo复制到我们的项目中。
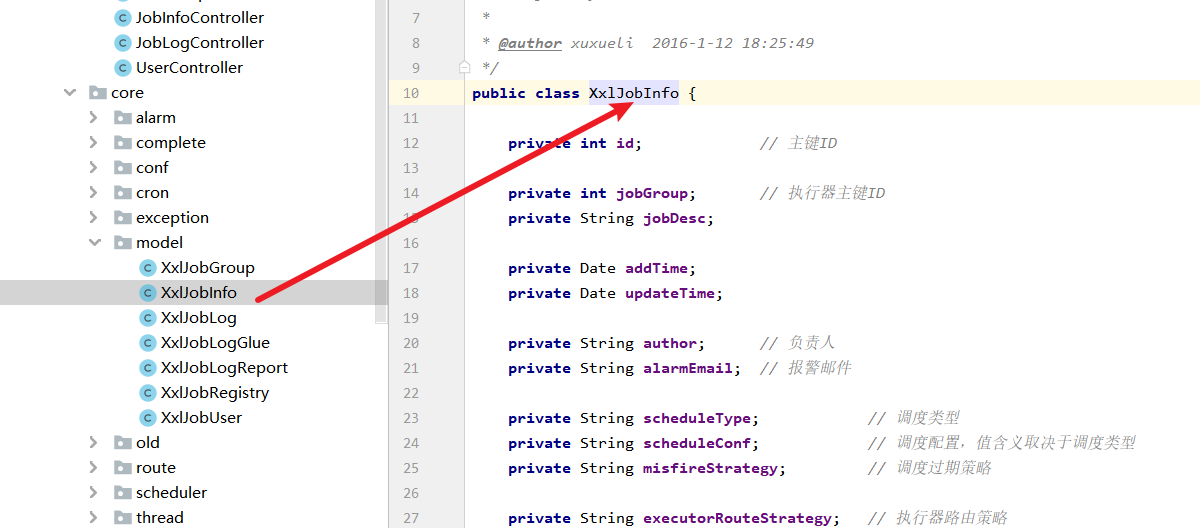
如下图所示,笔者将这个类复制到自己项目中的model路径中。
完成相关类的复制之后,就可以编写一个调用xxl-job-admin相关api的工具类XxlUtil
@Component
@RequiredArgsConstructor
public class XxlUtil {

  @Value("${xxl.job.admin.addresses}")
  private String xxlJobAdminAddress;

  private final RestTemplate restTemplate;

  // xxl-job各种请求地址
  private static final String ADD_INFO_URL = "/jobinfo/addJob";
  private static final String REMOVE_INFO_URL = "/jobinfo/removeJob";
  private static final String GET_GROUP_ID = "/jobgroup/loadByAppName";

  /**
   * 添加任务
   *
   * @param xxlJobInfo
   * @param appName
   * @return
   */
  public String addJob(XxlJobInfo xxlJobInfo, String appName) {
    //组装参数
    Map<String, Object> params = new HashMap<>();
    params.put("appName", appName);
    String json = JSONUtil.toJsonStr(params);
    //调用xxl-job接口添加任务
    String result = doPost(xxlJobAdminAddress + GET_GROUP_ID, json);

    //获取执行器的id
    JSONObject jsonObject = JSON.parseObject(result);
    Map<String, Object> map = (Map<String, Object>) jsonObject.get("content");
    Integer groupId = (Integer) map.get("id");


    xxlJobInfo.setJobGroup(groupId);
    String xxlJobInfoJson = JSONUtil.toJsonStr(xxlJobInfo);
    //添加这个job
    return doPost(xxlJobAdminAddress + ADD_INFO_URL, xxlJobInfoJson);
  }

  // 删除job
  public String removeJob(long jobId) {
    MultiValueMap<String, String> map = new LinkedMultiValueMap<String, String>();
    map.add("id", String.valueOf(jobId));
    return doPostWithFormData(xxlJobAdminAddress + REMOVE_INFO_URL, map);
  }

  /**
   * 远程调用
   *
   * @param url
   * @param json
   */
  private String doPost(String url, String json) {
    HttpHeaders headers = new HttpHeaders();
    headers.setContentType(MediaType.APPLICATION_JSON);
    HttpEntity<String> entity = new HttpEntity<>(json, headers);
    ResponseEntity<String> responseEntity = restTemplate.postForEntity(url, entity, String.class);
    return responseEntity.getBody();
  }

  private String doPostWithFormData(String url, MultiValueMap<String, String> map) {
    HttpHeaders headers = new HttpHeaders();
    headers.setContentType(MediaType.APPLICATION_FORM_URLENCODED);
    HttpEntity<MultiValueMap<String, String>> entity = new HttpEntity<>(map, headers);
    ResponseEntity<String> responseEntity = restTemplate.postForEntity(url, entity, String.class);
    return responseEntity.getBody();
  }

}
完成工具类的编写之后,我们通过XxlService 将工具类集成进来。
@Service
@Slf4j
@RequiredArgsConstructor
public class XxlService {

  private final XxlUtil xxlUtil;

  @Value("${xxl.job.executor.appname}")
  private String appName;

  public void addJob(XxlJobInfo xxlJobInfo) {
    xxlUtil.addJob(xxlJobInfo, appName);
    long triggerNextTime = xxlJobInfo.getTriggerNextTime();
    log.info("任务已添加,将在{}开始执行任务", DateUtils.formatDate(triggerNextTime));
  }

}
完成业务功能开发
完成xxl-job集成工作之后,我们就可以编写业务代码了,我们代码逻辑如下整体步骤为:
- 校验入参。
- 存储信息到user表。
- 创建定时任务,以sayHelloHandler作为执行器,userName为参数。
- 调用封装的api调用xxl-job-admin的api。
@Service
@RequiredArgsConstructor
@Slf4j
public class UserService {

    private final UserMapper userMapper;
    private final UserStruct userStruct;
    private final XxlService xxlService;

    /**
     * 假设有这样一个业务需求,每当有新用户注册,则1分钟后会给用户发送欢迎通知.
     *
     * @param userRequest 用户请求体
     */
    @Transactional
    public void register(UserRequest userRequest) {
        //参数校验
        if (Objects.isNull(userRequest) ||
                isBlank(userRequest.getUsername()) ||
                isBlank(userRequest.getPassword())) {
            BusinessException.fail("账号或密码为空!");
        }

        //插入用户信息
        User user = userStruct.toUser(userRequest);
        userMapper.insert(user);

        //创建一个1分钟后向用户问好的任务
        LocalDateTime scheduleTime = LocalDateTime.now().plusMinutes(1L);
        XxlJobInfo xxlJobInfo = XxlJobInfo.builder().jobDesc("定时给用户发送通知").author("mjx")
                .scheduleType("CRON").scheduleConf(DateUtils.getCron(scheduleTime)).glueType("BEAN")
                .glueType("BEAN")
                .executorHandler("sayHelloHandler")
                .executorParam(user.getUsername())
                .misfireStrategy("DO_NOTHING")
                .executorRouteStrategy("FIRST")
                .triggerNextTime(DateUtils.toEpochMilli(scheduleTime))
                .executorBlockStrategy("SERIAL_EXECUTION").triggerStatus(1).build();
        //将任务提交到xxl-job-admin
        xxlService.addJob(xxlJobInfo);
    }


}
补充一下上文提到的SayHelloHandler 源码,注意笔者的操作,因为注册量比较大,所以我们提交的定时任务需要删除,所以sayHelloHandler执行完任务后会将任务删除。
@Component
@RequiredArgsConstructor
public class SayHelloHandler {

    private final UserService userService;
    private final XxlUtil xxlUtil;

    private static Logger logger = LoggerFactory.getLogger(SayHelloHandler.class);


    @XxlJob(value = "sayHelloHandler")
    public void execute() {
        String userName = XxlJobHelper.getJobParam();

        logger.info("welcome {}", userName);

        //未避免一次性任务,留在界面,这里手动删除处理掉
        long jobId = XxlJobHelper.getJobId();
        xxlUtil.removeJob(jobId);
    }
}
测试
我们使用api工具调用这个接口。
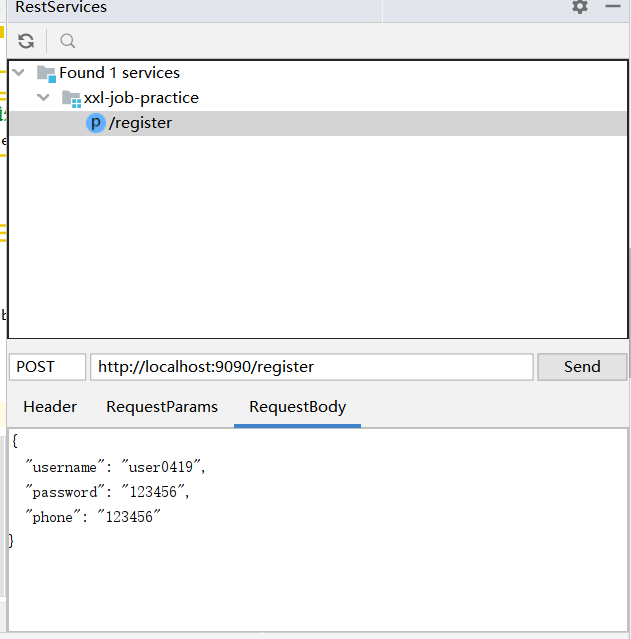
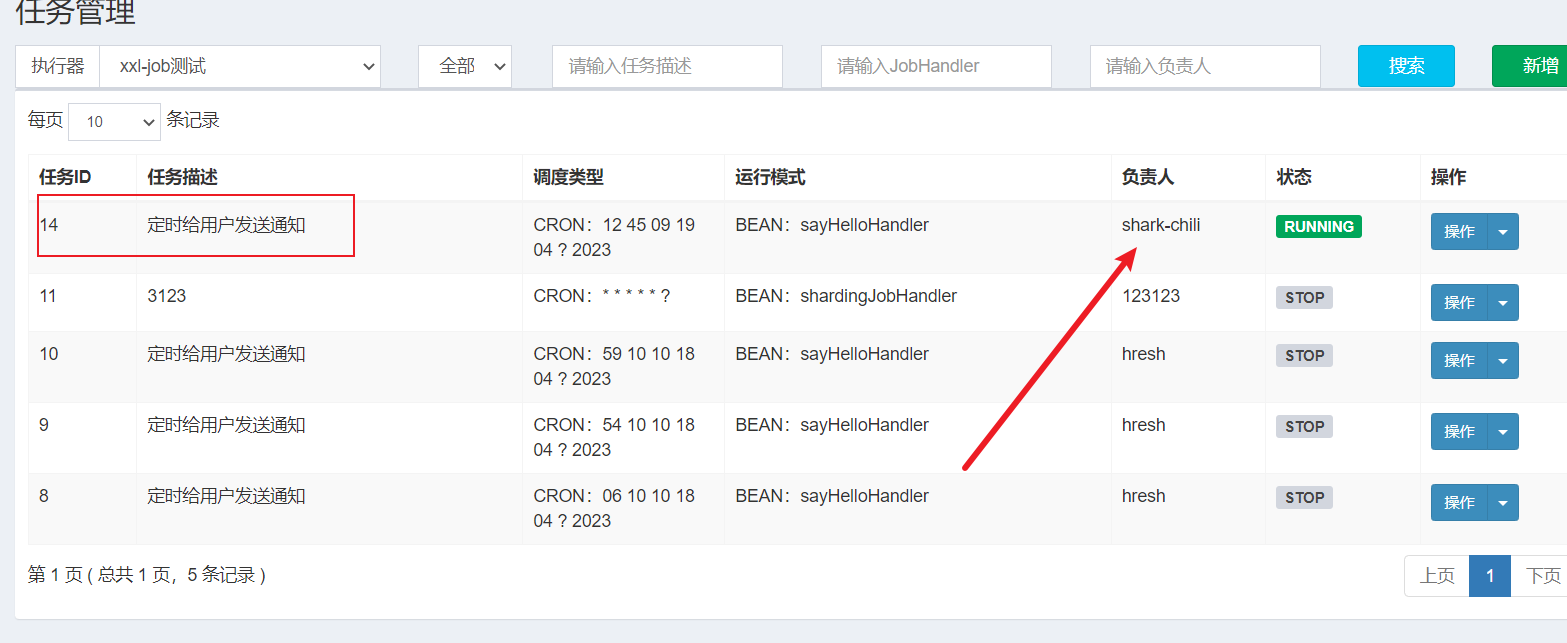
从控制台可以看到任务提交了,我们不妨到web页面去看看。

可以看到页面确实出现了这个任务。
不久后,我们的执行器(即我们自己的web应用)会输出问候语

再次回到web页面可以看到刚刚完成的任务被删除了,自此我们的功能开发初步完成了。

集成邮件告警
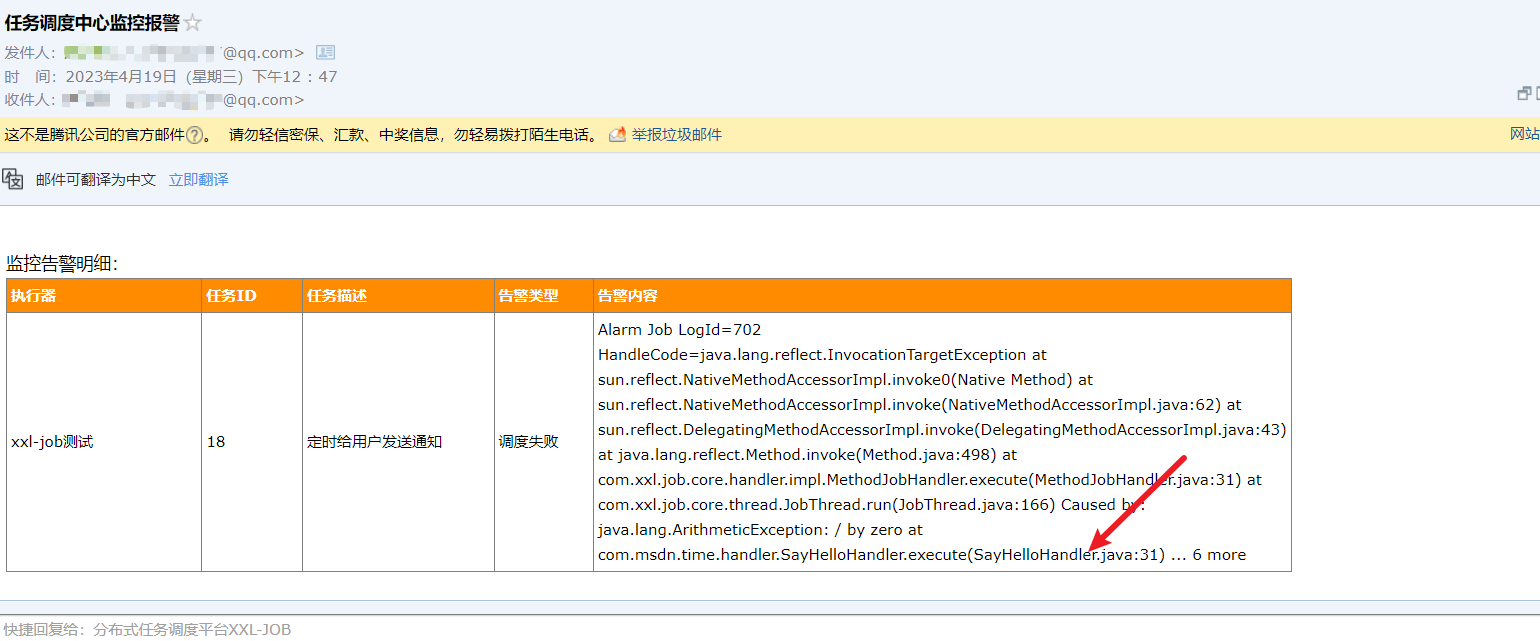
我们上文提到了这样一个需求,用户注册成功后我们会将xxl-job提交一个向用户问候的定时任务,假如这个任务执行失败,我们希望可以做到告警。现在我们不妨完善一下这个需求。 我们到xxl-job-admin中配置邮件相关参数,配置如下,读者可以按需修改邮箱号和授权码即可。
### xxl-job, email
spring.mail.host=smtp.qq.com
spring.mail.port=25
# 邮箱号
spring.mail.username=xxxx@qq.com
spring.mail.from=xxxx@qq.com
# 授权码
spring.mail.password=xxxxx


spring.mail.properties.mail.smtp.auth=true
spring.mail.properties.mail.smtp.starttls.enable=true
spring.mail.properties.mail.smtp.starttls.required=true
spring.mail.properties.mail.smtp.socketFactory.class=javax.net.ssl.SSLSocketFactory
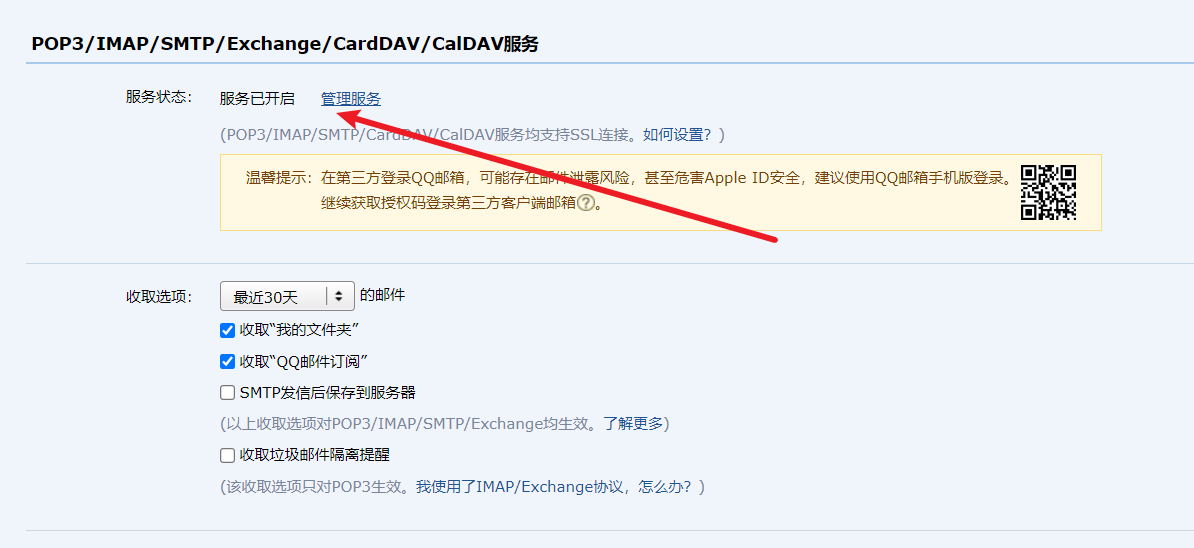
这里补充一下授权码是怎么来的,以笔者为例,笔者用的是qq邮箱,所以到qq邮箱页面点击设置。

到下方找到关于pop3等一栏,选择服务将其开启,然后我们就可以拿到授权码了。
然后到我们的userSerivce上,添加一下关于告警邮箱号的配置。

完成xxl-job-admin配置之后,我们不妨来测试一下,回到我们的web项目。在SayHelloHandler中编写一个算术异常。
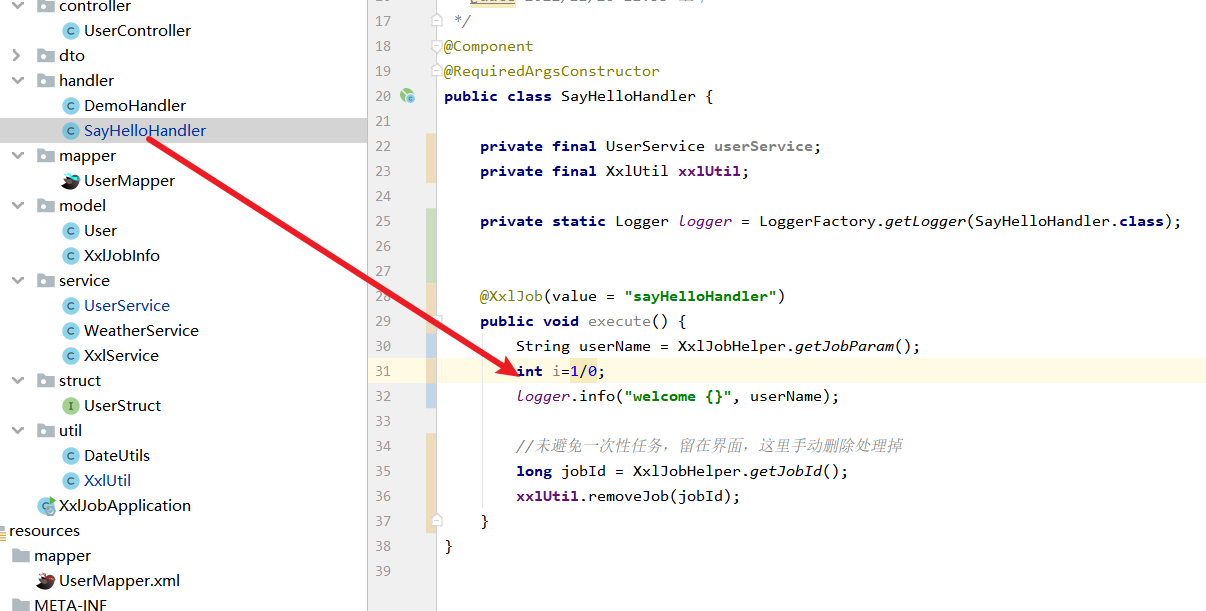
将项目启动,调用一下用户注册的接口。
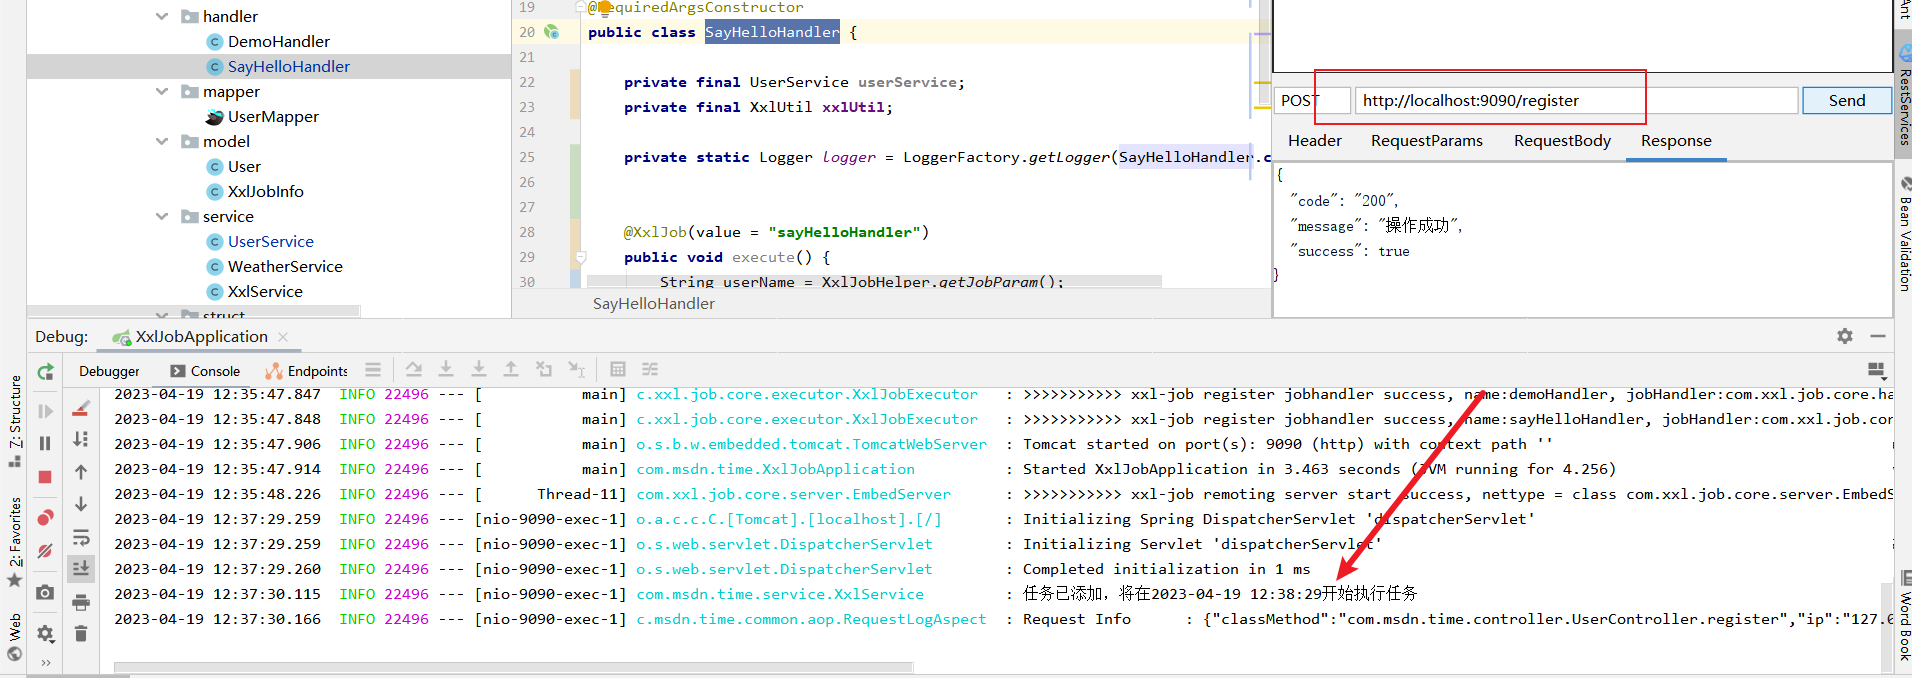
1分钟之后,代码执行报错,打开我们的邮箱即可发现这个问题邮件。自此,该需求完成了。
魔改xxl-job,封装自定义starter
需求
我们在使用xxl-job时发现这么一件事情,每次需要配置新任务都需要在页面疯狂点击配置,对于几个简单的配置来说还好,但是对于需要经常新增任务的web项目来说,这种配置步骤十分繁琐。 此时,我们希望有没有这样一个工具,可以让我们只需一个注解即可将执行器和任务直接注册道xxl-job-admin上,这样我们只需在编码阶段写好任务将项目启动,就可以将任务注册道xxl-job-admin中。

实现思路
做到这一点其实很简单,我们可以借由spring-boot自动装配机制,并定义一个注解,扫描容器中所有执行器和带有这个注解的任务,然后调用xxl-job的api将这些任务注册到xxl-job-admin中。
编写组件
我们首先创建一个spring-boot项目,引入下面这几个依赖
<dependency>
    <groupId>org.springframework.boot</groupId>
    <artifactId>spring-boot-starter-web</artifactId>
</dependency>

<dependency>
    <groupId>org.springframework.boot</groupId>
    <artifactId>spring-boot-autoconfigure</artifactId>
</dependency>
        <!-- xxl-job-core -->
<dependency>
    <groupId>com.xuxueli</groupId>
    <artifactId>xxl-job-core</artifactId>
    <version>${xxl-job.version}</version>
</dependency>

<dependency>
    <groupId>cn.hutool</groupId>
    <artifactId>hutool-all</artifactId>
    <version>${hutool.version}</version>
</dependency>
首先我们从xxl-job-admin中将这两个类拷过来。
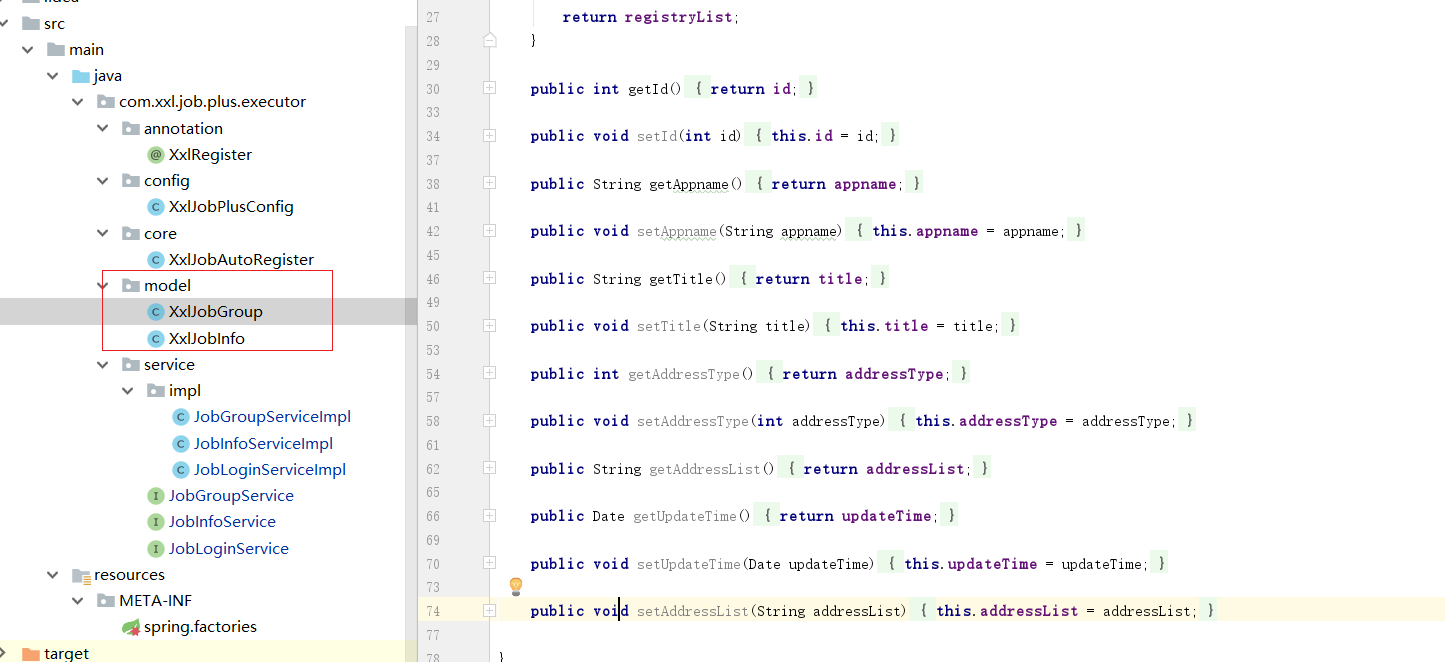
我们在web界面操作xxl-job-admin时发现所有操作都需要基于一个cookie,而这个cookie是需要登录才能得到的。
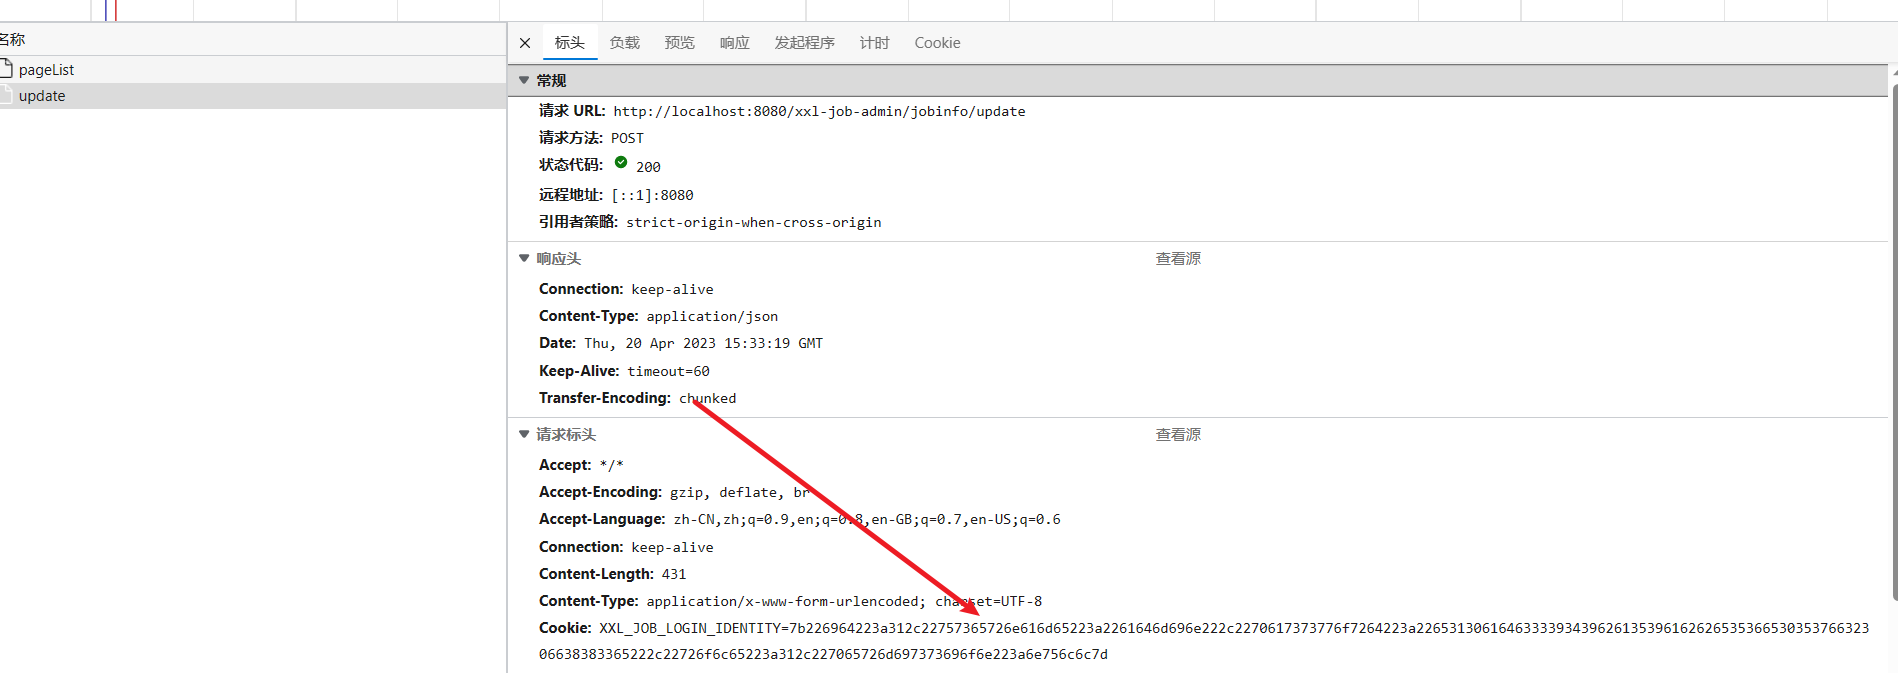
所以我们定义一个接口,后续将登录和获取cookie保存到内存的操作补充上。
public interface JobLoginService {

    /**
     * 登录xxl-job-admin
     */
    void login();

    /**
     * 获取登录后的cookie
     * @return
     */
    String getCookie();

}
同理然后编写一个接口,定义所有关于执行器的bean的操作。
public interface JobGroupService {

    /**
     * 查询执行器
     * @return
     */
    List<XxlJobGroup> getJobGroup();

    /**
     * 自动注册执行器
     * @return
     */
    boolean autoRegisterGroup();

    /**
     * 精确查询执行器
     * @return
     */
    boolean preciselyCheck();

}
上文提到我们也需要将任务注册到xxl-job上,所以在这里我们也把这个接口定义上。
public interface JobInfoService {

    /**
     * 查询xxl-job-admin上是否有这个任务
     * @param jobGroupId
     * @param executorHandler
     * @return
     */
    List<XxlJobInfo> getJobInfo(Integer jobGroupId, String executorHandler);

    /**
     * 添加任务到xxl-job-admin上
     * @param xxlJobInfo
     * @return
     */
    Integer addJobInfo(XxlJobInfo xxlJobInfo);

}
自此所有我们需要的行为都有了,我们就需要开始将逻辑补充上了。首先是登录和获取cookie的方法。代码含义都详细注释了,读者可以自行查阅,这里简单说明一下登录进行的操作就是:
- 调用xxl-job登录接口
- 成功后获取cookie
- 将cookie缓存到map中
而获取cookie的方式也很简单,从map中取出来返回出去就好了。
@Service
public class JobLoginServiceImpl implements JobLoginService {


    /**
     * 从配置文件获取的xxl-job地址
     */
    @Value("${xxl.job.admin.addresses}")
    private String adminAddresses;

    /**
     * 从配置文件获取的登录用户名
     */
    @Value("${xxl.job.admin.username}")
    private String username;

    /**
     * 从xxl-job获取的登录密码
     */
    @Value("${xxl.job.admin.password}")
    private String password;

    /**
     * 缓存cookie的密码
     */
    private final Map<String, String> loginCookie = new HashMap<>();

    /**
     * 调用登录接口将XXL_JOB_LOGIN_IDENTITY缓存下来后续使用
     */
    @Override
    public void login() {
        //调用登录接口
        String url = adminAddresses + "/login";
        HttpResponse response = HttpRequest.post(url)
                .form("userName", username)
                .form("password", password)
                .execute();

        //获取登录后的cookie
        List<HttpCookie> cookies = response.getCookies();

        //尝试获得XXL_JOB_LOGIN_IDENTITY
        Optional<HttpCookie> cookieOpt = cookies.stream()
                .filter(cookie -> cookie.getName().equals("XXL_JOB_LOGIN_IDENTITY"))
                .findFirst();
        if (!cookieOpt.isPresent()) {
            throw new RuntimeException("get xxl-job cookie error!");
        }

        //如果存在这个cookie则将其缓存起来
        String value = cookieOpt.get().getValue();
        loginCookie.put("XXL_JOB_LOGIN_IDENTITY", value);
    }

    /**
     * 尝试从内存中获取cookie,如果没有则尝试3次登录即可
     * @return
     */
    @Override
    public String getCookie() {
        for (int i = 0; i < 3; i++) {
            String cookieStr = loginCookie.get("XXL_JOB_LOGIN_IDENTITY");
            if (cookieStr != null) {
                return "XXL_JOB_LOGIN_IDENTITY=" + cookieStr;
            }
            login();
        }
        throw new RuntimeException("get xxl-job cookie error!");
    }


}
然后就是执行器注册的逻辑了,整体来说有两个方法,分别是精确查询执行器和注册执行器的方法,含义都详尽注释在代码上,读者可自行参阅。
@Service
public class JobGroupServiceImpl implements JobGroupService {

    @Value("${xxl.job.admin.addresses}")
    private String adminAddresses;

    @Value("${xxl.job.executor.appname}")
    private String appName;

    @Value("${xxl.job.executor.title}")
    private String title;

    /*
     * 执行器地址类型:0=自动注册、1=手动录入
     * */
    @Value("${xxl.job.executor.addressType:0}")
    private Integer addressType;

    /*
     * 执行器地址列表,多地址逗号分隔(手动录入)
     * */
    @Value("${xxl.job.executor.addressList:}")
    private String addressList;

    @Autowired
    private JobLoginService jobLoginService;


    /**
     * 精确查询执行器
     *
     * @return
     */
    @Override
    public boolean preciselyCheck() {
        //调用xxl-job模糊查询job的api
        List<XxlJobGroup> jobGroup = getJobGroup();
        //精确匹配执行器名称
        Optional<XxlJobGroup> has = jobGroup.stream()
                .filter(xxlJobGroup -> xxlJobGroup.getAppname().equals(appName)
                        && xxlJobGroup.getTitle().equals(title))
                .findAny();
        //返回该执行器是否存在
        return has.isPresent();
    }

    /**
     * 查询执行器列表
     *
     * @return
     */
    @Override
    public List<XxlJobGroup> getJobGroup() {
        String url = adminAddresses + "/jobgroup/pageList";
        HttpResponse response = HttpRequest.post(url)
                .form("appname", appName)
                .form("title", title)
                .cookie(jobLoginService.getCookie())
                .execute();

        String body = response.body();
        JSONArray array = JSONUtil.parse(body).getByPath("data", JSONArray.class);
        List<XxlJobGroup> list = array.stream()
                .map(o -> JSONUtil.toBean((JSONObject) o, XxlJobGroup.class))
                .collect(Collectors.toList());

        return list;
    }

    /**
     * 调用xxl-job保存执行器的api,将执行器保存到xxl-job上
     *
     * @return
     */
    @Override
    public boolean autoRegisterGroup() {
        //组装请求地址
        String url = adminAddresses + "/jobgroup/save";

        //组装表单参数
        HttpRequest httpRequest = HttpRequest.post(url)
                .form("appname", appName)
                .form("title", title);

        //组装地址类型和注册地址
        httpRequest.form("addressType", addressType);
        if (addressType.equals(1)) {
            if (Strings.isBlank(addressList)) {
                throw new RuntimeException("手动录入模式下,执行器地址列表不能为空");
            }
            httpRequest.form("addressList", addressList);
        }

        //执行请求,带上我们之前缓存的cookie
        HttpResponse response = httpRequest.cookie(jobLoginService.getCookie())
                .execute();
        Object code = JSONUtil.parse(response.body()).getByPath("code");

        //返回200就说明注册成功
        return code.equals(200);
    }


}
最后就是任务注册的接口实现了,核心方法也是模糊查询任务列表和注册任务两个方法,读者参阅注释即可理解,这里不多赘述。
@Service
public class JobInfoServiceImpl implements JobInfoService {

    //xxl-job地址
    @Value("${xxl.job.admin.addresses}")
    private String adminAddresses;

    @Autowired
    private JobLoginService jobLoginService;

    /**
     * 模糊查询任务列表
     *
     * @param jobGroupId
     * @param executorHandler
     * @return
     */
    @Override
    public List<XxlJobInfo> getJobInfo(Integer jobGroupId, String executorHandler) {
        //组装查询url
        String url = adminAddresses + "/jobinfo/pageList";
        //调用查询接口
        HttpResponse response = HttpRequest.post(url)
                .form("jobGroup", jobGroupId)
                .form("executorHandler", executorHandler)
                .form("triggerStatus", -1)
                .cookie(jobLoginService.getCookie())
                .execute();

        String body = response.body();
        JSONArray array = JSONUtil.parse(body).getByPath("data", JSONArray.class);
        List<XxlJobInfo> list = array.stream()
                .map(o -> JSONUtil.toBean((JSONObject) o, XxlJobInfo.class))
                .collect(Collectors.toList());

        //返回任务列表
        return list;
    }

    /**
     * 添加一个任务到任务列表
     *
     * @param xxlJobInfo
     * @return
     */
    @Override
    public Integer addJobInfo(XxlJobInfo xxlJobInfo) {
        //组装查询url
        String url = adminAddresses + "/jobinfo/add";
        //执行添加逻辑
        Map<String, Object> paramMap = BeanUtil.beanToMap(xxlJobInfo);
        HttpResponse response = HttpRequest.post(url)
                .form(paramMap)
                .cookie(jobLoginService.getCookie())
                .execute();

        //处理并返回结果
        JSON json = JSONUtil.parse(response.body());
        Object code = json.getByPath("code");
        if (code.equals(200)) {
            return Convert.toInt(json.getByPath("content"));
        }
        throw new RuntimeException("add jobInfo error!");
    }

}
自此所有核心工作方法都完成了。我们就可以基于spring-boot的自动装配自动调用这些方法完成执行器和任务的注册。
首先我们定义一个注解,用于要注册到xxl-job的任务的信息。
/**
 * 用于实现任务自动注册
 */
@Target({ElementType.METHOD})
@Retention(RetentionPolicy.RUNTIME)
public @interface XxlRegister {

    /**
     * 任务执行的cron表达式
     * @return
     */
    String cron();

    /**
     * 任务描述
     * @return
     */
    String jobDesc() default "default jobDesc";

    /**
     * 任务作者
     * @return
     */
    String author() default "default Author";

    /*
     * 默认为 ROUND 轮询方式
     * 可选: FIRST 第一个
     * */
    String executorRouteStrategy() default "ROUND";

    /**
     * 如果是1则自动注册
     * @return
     */
    int triggerStatus() default 0;
}
重点来了,现在我们要编写一个XxlJobAutoRegister扫描容器中带有XxlJob、XxlRegister的方法,并通过xxl-job-admin的api将其注册上去。
代码逻辑很简单,通过ApplicationContextAware获取容器中的bean,然后基于ApplicationListener监听容器加载情况,在容器准备好提供服务时,做下面这几件事:
- 通过ApplicationContextAware找到所有的bean
- 遍历bean,找到带有XxlJob的方法。
- 查看带有XxlJob的方法是否有XxlRegister,如果有则将其注册到xxl-job-admin
@Component
public class XxlJobAutoRegister implements ApplicationListener<ApplicationReadyEvent>,
        ApplicationContextAware {

    private static final Log log = LogFactory.get();

    private ApplicationContext applicationContext;

    @Autowired
    private JobGroupService jobGroupService;

    @Autowired
    private JobInfoService jobInfoService;

    @Override
    public void setApplicationContext(ApplicationContext applicationContext) throws BeansException {
        this.applicationContext = applicationContext;
    }

    @Override
    public void onApplicationEvent(ApplicationReadyEvent event) {
        //注册执行器
        addJobGroup();
        //注册任务
        addJobInfo();
    }

    //自动注册执行器
    private void addJobGroup() {
        //如果存在执行器,则直接返回,说明已经注册过了
        if (jobGroupService.preciselyCheck())
            return;
        //否则手动注册一下执行器
        if (jobGroupService.autoRegisterGroup())
            log.info("auto register xxl-job group success!");
    }

    /**
     * 将带有XxlRegister的注解的方法提交到xxl-job-admin中
     */
    private void addJobInfo() {
        List<XxlJobGroup> jobGroups = jobGroupService.getJobGroup();
        XxlJobGroup xxlJobGroup = jobGroups.get(0);
        //拿到所有的bean名称
        String[] beanDefinitionNames = applicationContext.getBeanNamesForType(Object.class, false, true);

        for (String beanDefinitionName : beanDefinitionNames) {
            Object bean = applicationContext.getBean(beanDefinitionName);

            //找到这个bean中带有XxlJob的方法
            Map<Method, XxlJob> methodWithXxlJob = MethodIntrospector.selectMethods(bean.getClass(),
                    (MethodIntrospector.MetadataLookup<XxlJob>) method -> AnnotatedElementUtils.findMergedAnnotation(method, XxlJob.class));


            for (Map.Entry<Method, XxlJob> methodXxlJobEntry : methodWithXxlJob.entrySet()) {
                //带有XxlJob的方法名
                Method executeMethod = methodXxlJobEntry.getKey();
                //XxlJob注解配置的值
                XxlJob xxlJob = methodXxlJobEntry.getValue();

                //如果executeMethod带有XxlRegister注解
                if (executeMethod.isAnnotationPresent(XxlRegister.class)) {


                    List<XxlJobInfo> jobInfo = jobInfoService.getJobInfo(xxlJobGroup.getId(), xxlJob.value());
                    if (!jobInfo.isEmpty()) {
                        //因为是模糊查询,需要再判断一次
                        Optional<XxlJobInfo> first = jobInfo.stream()
                                .filter(xxlJobInfo -> xxlJobInfo.getExecutorHandler().equals(xxlJob.value()))
                                .findFirst();
                        //如果任务已经存在则不管了
                        if (first.isPresent())
                            continue;
                    }
                    //创建任务并注册
                    XxlRegister xxlRegister = executeMethod.getAnnotation(XxlRegister.class);
                    XxlJobInfo xxlJobInfo = createXxlJobInfo(xxlJobGroup, xxlJob, xxlRegister);
                    Integer jobInfoId = jobInfoService.addJobInfo(xxlJobInfo);
                }
            }
        }
    }

    /**
     * 基于XxlRegister封装成一个xxlJobInfo对象提交到xxl-job-admin中
     * @param xxlJobGroup
     * @param xxlJob
     * @param xxlRegister
     * @return
     */
    private XxlJobInfo createXxlJobInfo(XxlJobGroup xxlJobGroup, XxlJob xxlJob, XxlRegister xxlRegister) {
        XxlJobInfo xxlJobInfo = new XxlJobInfo();
        xxlJobInfo.setJobGroup(xxlJobGroup.getId());
        xxlJobInfo.setJobDesc(xxlRegister.jobDesc());
        xxlJobInfo.setAuthor(xxlRegister.author());
        xxlJobInfo.setScheduleType("CRON");
        xxlJobInfo.setScheduleConf(xxlRegister.cron());
        xxlJobInfo.setGlueType("BEAN");
        xxlJobInfo.setExecutorHandler(xxlJob.value());
        xxlJobInfo.setExecutorRouteStrategy(xxlRegister.executorRouteStrategy());
        xxlJobInfo.setMisfireStrategy("DO_NOTHING");
        xxlJobInfo.setExecutorBlockStrategy("SERIAL_EXECUTION");
        xxlJobInfo.setExecutorTimeout(0);
        xxlJobInfo.setExecutorFailRetryCount(0);
        xxlJobInfo.setGlueRemark("GLUE代码初始化");
        xxlJobInfo.setTriggerStatus(xxlRegister.triggerStatus());

        return xxlJobInfo;
    }

}
自此我们的组件开发完成了,为了让上面的XxlJobAutoRegister,我们需要编写一个配置类XxlJobPlusConfig,他会扫描XxlJobAutoRegister的包。
@Configuration
@ComponentScan(basePackages = "com.xxl.job.plus.executor")
public class XxlJobPlusConfig {
}
然后编写一个spring.factories,将XxlJobPlusConfig路径写入,确保其他引入该组件时会自动装配XxlJobAutoRegister将指定的xxl-job注册上去。
org.springframework.boot.autoconfigure.EnableAutoConfiguration=\
  com.xxl.job.plus.executor.config.XxlJobPlusConfig
引入组件并进行测试
首先将上述组件打包,然后在需要使用这个组件的应用中引入
        <dependency>
            <groupId>com.cn.hydra</groupId>
            <artifactId>xxljob-autoregister-spring-boot-starter</artifactId>
            <version>0.0.1</version>
        </dependency>
以笔者为例,这里直接使用xxl源码自带的spring-boot项目。
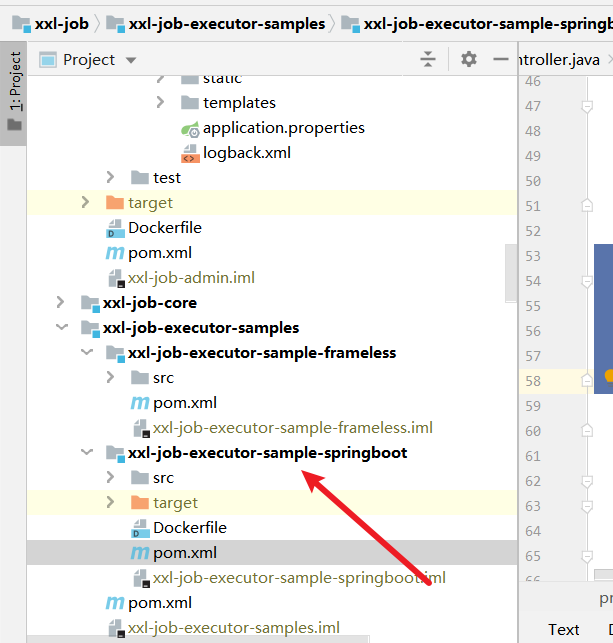
编写一个自定义的bean
@Service
public class TestService {


    private static Logger logger = LoggerFactory.getLogger(TestService.class);

    @XxlJob(value = "testJob")
    @XxlRegister(cron = "0 0 0 * * ? *",
            author = "mjx",
            jobDesc = "测试job")
    public void testJob(){
       logger.info("testJob");
    }


    @XxlJob(value = "hello")
    @XxlRegister(cron = "0 0 0 * * ? *",
            triggerStatus = 1)
    public void hello(){
        logger.info("hello this is mjx");
    }


}
最后新增如下配置
# 新增配置项,必须项
# admin用户名
xxl.job.admin.username=admin
# admin 密码
xxl.job.admin.password=123456
# 执行器名称
xxl.job.executor.title=mjx

# 新增配置项,可选项
# 执行器地址类型:0=自动注册、1=手动录入,默认为0
xxl.job.executor.addressType=0
# 在上面为1的情况下,手动录入执行器地址列表,多地址逗号分隔
xxl.job.executor.addressList=http://127.0.0.1:9999
最后将xxl-job-admin和xxl-job启动,打开xxl-job的管理页面,可以看到我们的任务都注册进来了。

执行该任务一次

可以看到,控制台成功,自此我们的实践都完成了。

关于源码
笔者本次功能都是参考这个仓库的项目,感兴趣的读者可以自行调试一下。
https://github.com/trunks2008/xxl-job-auto-register